1914: Glory’s End Part Three
This is the final part of Heinrich Mauthner’s story on the Western Front in 1914. Although I think ‘Glory’s End’ is a great simulation of this early part of the First World War, it was just too general and large-scale for my purposes. I intend to start all over again, using Mike Resch’s ‘Offensive a Outrance’ game as the strategic/operational model. Watch this space!
Back to Mauthner, and the 9th Corps has had its first major action in the First Battle of the Somme (see Part Two). The 18th Division is further blooded on the 11th of September, but Mauthner’s 17th Division is held in Reserve (this is the kind of thing that was ‘abstracted’ by me in this wargame, but will be more part of the gameplay itself in Mike Resch’s design).
The First Battle of the Somme grinds down into stalemate and attention diverts north where the French army on the Channel coast tries to link up with the Belgians south of Boulogne. The German First Army redirects several divisions to this sector, including those of 9th Corps. But a long march north by Mauthner and his colleagues ends fruitlessly as the remaining Belgian and outnumbered French units are dispatched with before they arrive. Another long march south back to the stiffening front-line south of Amiens.
Again we follow Mauthner’s narrative as 17th Division nears the front-line south of the Somme river ( again, I was using platoon-level miniatures rules to simulate these actions):
23rd September. We advance from Boves early morning, the town knocked about since last time. The British had retaken it but withdrawn again. The French are now in front. Marching along road south, early afternoon first shell-fire heard ahead, steadily growning in intensity. Then heard in front as we enter Guyencourt, about 2 kilometres ahead. We are held up in the town as our artillery moves up to deal with enemy batteries. We move out into a forest, shelling heavy and continuous on the road ahead to Jumel – 1st Battalion getting it. Shelling grows heavier still and closer. We see bursts on the main road, trying to get our field guns about a kilometre away. French ’75’s which come over at a terrible rate of fire. Bursts fall near the forest we are situated in, a continuous roar of explosions as we are ordered forward, our own guns returning fire as we pass. Coming out of the woods the shelling continues, but not on us, some of our own bursting 2 kilometres away, trying to take care of their guns. We enter the town of Jumel. 1st Battalion has moved across the river. Shelling has died down a little. But as we advance on between the road and river towards the next village, a torrent of shells rains down. The 600 metres to Berny is a long way as the shells fall, mostly behind us, but we make it with no casualties. Enemy fire still falling on the town but we are able to take shelter. These ’75’s are vicious weapons! As it becomes dark the shelling tails off. We check the buildings and await new orders.
As we make ourselves comfortable, all of a sudden we come under an onslaught of shells in the gathering darkness, scrambling for cover in the buildings, shrapnel clattering all around, lasting for about a quarter of an hour, then the shelling moves off to the south. We are all on high alert in case of a night counterattack. The shelling continues intermittently until midnight, then we get some sleep.
24th September. Awoken about 4 in morning, more shelling to the rear and in the woods to our front. The Leutnant tells us to get ready for moving. All this seems to lead up to something. Soon we are told that we shall be the lead company in the coming advance and we move out a few hours before dawn. More shelling up ahead in the darkness, flashes rapidly one after another, then quiet as we move slowly up along the riverbank. We halt on a road by a forest and await first light, which is not long in coming. We move out, advancing in line astride a road at the base of a steep slope, the river to our right. We see a wood in the brightening light to our front. Suddenly the air is filled with the sound of whizzing shells – whizzz-bang! whizzz-bang! Falling all around us, we fall flat on our faces and hug the earth. A scream above the roar – a man badly wounded. The shells drop their range slightly, Korporal Dietl comes over and urges us on. I see Georg doesn’t get up. He is lying on the ground, lifeless – I turn him over, his head a mass of blood – he’s dead, but at least he hasn’t suffered. The shells fall near again. We clutch the earth again, I beside Georg’s still body, explosions ringing in our ears. Chaos, men shouting for stretcher-bearers. Gerhard, a few metres away, cries out. He’s been hit and clutches his chest in pain. Others crying out, screaming. The thunder of detonations, smoke, shrapnel whizzing into the grass all around. We can’t move in this hell! Eventually the shelling dies off and we edge forward. Korporal Dietl has been killed. Leutnant Hartmann is wounded, Korporal Engelke killed. Shells fall again but to our rear on the following platoons of the company. Everything is confusion as we gain cover at last in the woods to our front. The enemy are not occupying it. We stop for breath, wounds are attended. Siggi, Johann and Gunther, too, all have received wounds. I am untouched.
The above account was actually wargamed using the ‘Over The Top’ miniature wargames rules by Frank Chadwick, and the shelling of Mauthner’s platoon using ‘ASL’ rules, house-modified for World War One, and my own system devised to simulate what happens to the individual characters. My character had a very lucky escape!
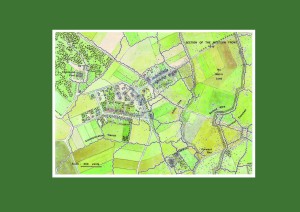
As a postscript to this final narrative of the game, I used part of the map I had created for the tactical wargame in another project for my portfolio, updating it to the trenchlines of 1916:
1914: Glory’s End Part Two
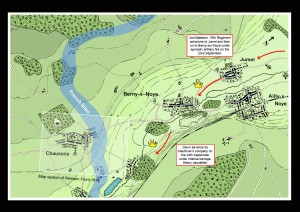
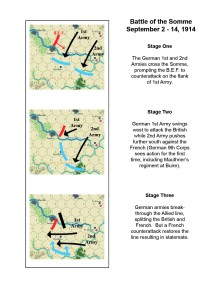
Heinrich Mauthner, having marched through Belgium and northern France with the 9th Corps without seeing action, is at last placed in the front line advance with the 76th Regiment. The British Expeditionary Force has counter-attacked the Germans after they crossed the Somme river and have set up a defence line north of the Somme, part of which is attacked on the morning of the 5th of September by Mauthner’s division. The attack is part of a general attack by 9th Corps on the British lines (see map in Part One). Below is a detailed map of my ‘window’ wargame’, using Frank Chadwick’s First World War version of GDW’s ‘Command Decision’ miniature rules: 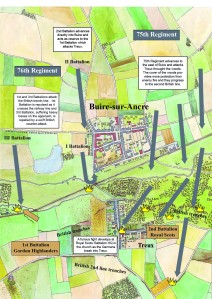 Mauthner’s 2nd Battalion is held in reserve, advancing behind the 1st Battalion (the position of battalions in the attack is worked out randomly with dice throws, Mauthner’s battalion luckily avoiding the British infantry’s ‘mad minute’ this time). Here is a present time narrative of his experiences: Advance off main road into shallow valley around 6.oo am. Mist, but clearing as sun rises. Shortly after, artillery fire landing 1 000 metres to the left. We advance down a road towards a cemetery. Artillery fire falls behind us as we near the town, a few shells falling near, but no casualties. Our artillery unlimbers to our right behind the town. Tremendous din of shells exploding and our own artillery firing. Mist completely clears to a fine day. Small arms fire up ahead. More artillery fire on our right. We enter the town through gardens and yards and halt in a street. Rifle fire ahead very close. Then deafening artillery landing in front and our own artillery opening up behind. Windows smashing, masonry falling, earth roaring – a terrifying wave of sound as the shells land nearer. We wait, huddled in doorways and rooms, and then the enemy fire stops after about ten minutes, only our own artillery still firing behind. The firing becomes less regular and stops. We move forward along the road. A railway and road bridge ahead strewn with our dead and several horses (of the reconnaissance squadrons) – quite a slaughter. The village ahead (Treux) is heavily damaged with large shell craters. We go into the fields and inspect the enemy’s slit trenches. Some dead and wounded – Scottish soldiers. We move up the gentle slope beyond the village. Heavy sound of gunfire to the south-west, puffs of smoke about 2 kilometres away. A short halt, and then we are ordered forward, the enemy in full retreat, fire lessening. Some sporadic artillery fire. We reach another village and stop. We bivouac in the village. 2nd Battalion has had no casualties, but 1st Battalion has had almost 200, mostly from intense British rifle fire as they crossed the railway before Treux. 3rd Battalion suffers almost 50% casualties in its attack across open fields on the right flank. 75th Regiment has had a similar loss, but spread more evenly amongst its three battalions. The brigade has had over 1 800 casualties in total, but they have forced a hasty British retreat towards the Somme. This action has been part of a large battle fought over ten days, resulting in a stalling of the German advance and subsequent stalemate:
  Part Three will follow Mauthner on the ‘race to the sea’, as the Germans try to outflank the British and destroy the remaining Belgian army.
1914 : Glory’s End Part One
I have always been fascinated with the First World War, ever since I was a child watching the BBC’s documentary series, ‘The Great War’ back in the 1970’s. Three generations of Hamiltons were sat watching, the eldest member having been there on the Somme sixty years before, receiving a wound to the thigh which thankfully discharged him from his regiment (The Gordon Highlanders), still in one piece and allowing two more generations to succeed him.
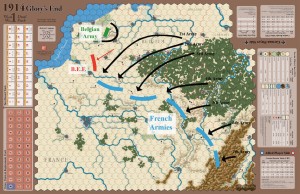
In the mid 90’s I set out on a grandiose project to wargame the Great War, depicting it at all levels using my ‘windows’ concept. I got as far as October 1914 (on the Western Front, at least), using the Command magazine game ‘1914: Glory’s End’ designed by Ted Raicer, as the master game. It’s nice to see that this game has been updated and republished lately with GMT games and I have used this version of the map below to show the general movements in my earlier game.
As you can see, ‘the swinging door on a hinge’ strategy of Count Schlieffen is in full swing, but with the Belgian and British armies holding up the right flank. My strategy for the Allies was to let the Germans come on, soaking up the attacks along the line with the French but holding the BEF back on the flank, ready to counterattack at the right moment. The right moment is just about to come, as the German 1st and 2nd Armies cross the Somme in early September.
To give myself the full immersive experience of the campaign I chose to make up a fictional soldier in the German army and follow his unit throught the fighting: Heinrich Mauthner, private in the 2nd Battalion, 76th Regiment, 17th Division, 9th Corps, 1st Army.
I traced his advance in a diary format, heavily influenced by my reading of ‘All Quiet on the Western Front’ by Erich Maria Remarque.
August involved a lot of waiting around for Mauthner, then a lot of marching through Belgium and northern France, but no combat. Things change at the beginning of September:
1st September
We are on patrol to the front of our position. The Leutnant warns us that the enemy could be near. Cavalry patrols pass in front of us. Rumours abound that it could be the Russians up ahead of us! We all cast a glance at Pobowski who seems unconcerned. Hear firing up ahead but only briefly. A steadier rumble of fire comes in from the south.
2nd September
Renewed heavy gunfire to the south. Patrols are sent out into Albert. Stories of a great deal of fighting just south of there. The British, it’s believed, are attacking the line. (they are)
3rd September
More heavy gunfire south. Obviously quite a battle going on. We seem to be some kind of rear guard on the advance to Paris. I hope this situation changes. We are ordered south, warned to be especially alert. The enemy must be near! We are all keen to fight and more than alert!
4th September
Continuous rumble to the south of gunfire. The battle has most definitely been joined. Many French prisoners being escorted back from the front, dishevelled, dirty, many wounded. At nightfall we are given orders to move out. The Leutnant says we are to move up to attack the enemy line in the river valley. We can hardly believe it after all this waiting. We are all looking forward to the action.
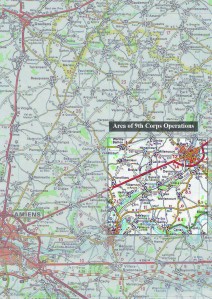
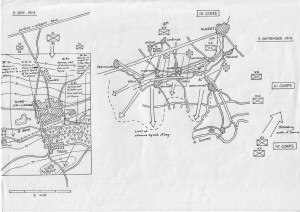
Mauthner’s division goes into action on the 5th September. Below is the plan of the 9th Corps’ attack and actions on that day:
In my next post I will show the detailed map of Mauthner’s brigade attacking the British line at Buire-Sur-L’Ancre, just north of the Somme river.
The Great Wargame
The big project of Graphic Wargames this year is to create a graphic story based on the 1914 campaign in north-western France and Belgium, using the excellent recently published design by Mike Resch, ‘1914, Offensive à Outrance’ (GMT Games). Mike has kindly given me access to the game graphics which will enable me to make a graphic AAR of the campaign. My intention is to follow the fortunes of two soldiers, one French and one German, throughout those dramatic first months of the war, and to make a graphic novel out of their story.
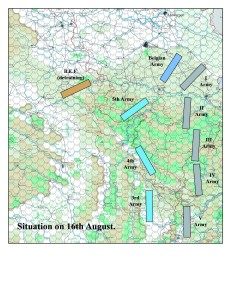
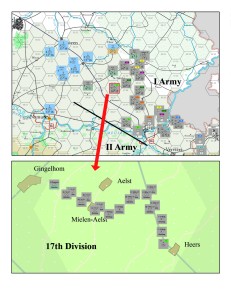
‘1914, Offensive à Outrance’ will tell the story at the level of division/brigade:
Then there will be a ‘window’ from division to battalion level (as in the lower illustration above), using the rules of ‘La Fleur au Fusil’ (Vae Victis) to fight the engagements in which the characters’ divisions are involved.
Further ‘windows’ will simulate the action at platoon and finally squad/individual soldier in order to tell exactly what happens to my two fictional characters, and the result will be made into a graphic story. The game will write the story.
This is obviously a BIG project, and my idea, if I get enough interest in the project, will be to publish the story serially as part of an emagazine which will involve other stories from other games (like the ‘En Pointe Toujours’ sample in my first post). In future posts I will outline ideas I have been working on for other games.
Please do drop me a line at ian.hamilton@sfr if you are interested in being put on the provisional list for a future emagazine.


